
TL;DR
Acoustic dampening alone won’t stop sound leaks; placement and sealing matter more. Putting your rig in a closet with proper ventilation and targeted treatment dramatically reduces noise and echo—making your recordings clearer and quieter.
Ever tried recording vocals or working on audio in a tiny closet? It’s a constant battle with sound bouncing off hard surfaces, echoing, and leaks sneaking through gaps. But what if the secret isn’t just adding foam or panels? What if the real game-changer is where you put your rig and how you treat the space around it?
This guide cuts through the noise—literally. You’ll learn how to make your closet sound better, not just inside but also in how it blocks sound from escaping. Whether you’re building a voice booth or just trying to quiet down a noisy PC, these tips will help you get the most out of your small space.
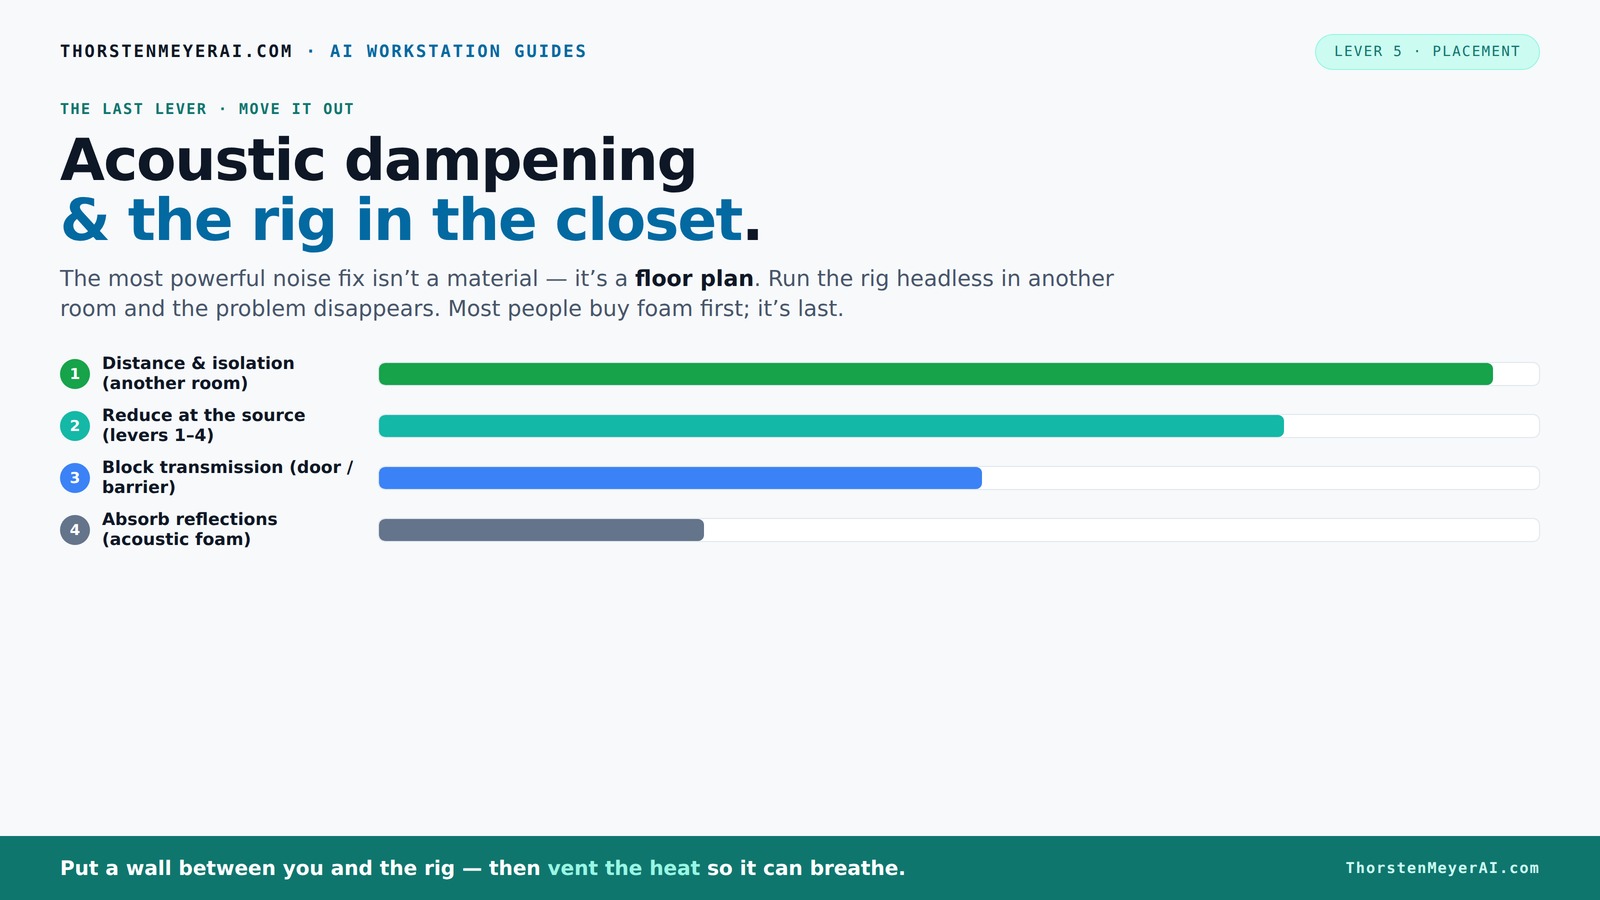
Acoustic dampening
& the rig in the closet.
The most powerful noise fix isn’t a material — it’s a floor plan. A rig you can’t hear because it’s in another room beats any amount of foam. Tap the approaches in Part 1 to see what actually works.
(another room)
(levers 1–4)
(door / barrier)
(acoustic foam)
Contain the noise, not the heat
Key Takeaways
- Moving your rig into a closet or cabinet drastically reduces noise—distance matters most.
- Sealing gaps around doors and vents is essential to prevent sound leaks, more so than adding foam panels.
- Placement of panels at first reflection points and ceilings yields the biggest internal acoustic improvements.
- Proper ventilation and heat management are critical when placing a rig in a sealed space to prevent overheating.
- Use soft furnishings like blankets and rugs as quick, budget-friendly acoustic treatments in small spaces.

Focusound 52 Pack Acoustic Foam Panels 1" x 12" x 12" Sound Proof Foam Panles Soundproofing Noise Cancelling Wedge Panels for Home Office Recoding Studio with 300PCS Double-Side Adhesive
- Soundproofing Design: Triangular grooves for noise absorption
- Includes Adhesive Tape: 300pcs double-sided adhesive for easy installation
- Easy Shape Recovery: Soak in water to restore foam shape
As an affiliate, we earn on qualifying purchases.
As an affiliate, we earn on qualifying purchases.
Why Acoustic Dampening Is Just Part of the Puzzle
Acoustic dampening is about softening echoes and reflections inside a room. It doesn’t block sound from leaving or entering. Think of it like adding carpet and curtains—great for internal clarity but not stopping noise from leaking out.
In small spaces like closets, the real issue is sound bouncing off hard surfaces and leaking through gaps. That’s why dampening alone won’t give you a quiet space. You need to combine it with smart placement and sealing strategies for real results.
According to experts, the biggest impact comes from controlling reflections at the first point of sound contact—the first reflection points—followed by sealing gaps and placing the rig away from your ears. These strategies are tradeoffs: dampening can dull internal sound if overused, and sealing gaps can be challenging in tight spaces, but together they create a more controlled environment that balances internal clarity with external noise reduction.
How Moving Your Rig to a Closet Can Cut Noise Significantly
Moving your noisy rig into a closet or cabinet is one of the most effective ways to quiet your workspace. When the machine is far away, the sound has to travel much further to reach you. Just like talking in a hallway vs. a closet—distance makes a huge difference, but it also introduces tradeoffs: the further the rig is, the more you need to think about ventilation and heat management. If not properly ventilated, your hardware can overheat, throttling performance and risking damage. Proper airflow ensures that noise reduction doesn’t come at the expense of hardware longevity.
Imagine your GPU humming at 70 dB on your desk. Inside a closet, that noise drops below 40 dB, which is barely noticeable. Plus, you can SSH into the machine, so it doesn’t need to be nearby. However, this setup requires planning: without ventilation, heat builds up quickly, and the noise from cooling fans can negate the benefit of distance. Therefore, integrating quiet exhaust fans, ducting, or active ventilation solutions becomes essential for maintaining performance while minimizing noise.
The 'Rig in the Closet' Setup — How to Do It Right
Placing your rig in a closet can be a game-changer. But it’s not just about shoving it in and closing the door. You need to think about ventilation, sealing gaps, and internal treatment. Properly implemented, this setup can significantly reduce noise transmission, but neglecting heat management can lead to overheating and performance issues, which is a critical tradeoff.
Here’s how to do it:
- Ventilate: Install passive vents or a quiet exhaust fan. Keep hot air escaping and fresh air coming in to prevent heat buildup, which can affect hardware lifespan and performance.
- Seal gaps: Use weatherstripping or acoustic sealant around the door and any openings. This reduces sound leaks but also affects airflow, so balance is key.
- Line the inside: Add acoustic foam or blankets on hard surfaces to reduce internal reflections, improving internal sound quality and reducing echo.
- Manage heat: Use an exhaust fan or an AIO cooler with ducting to move heat outside. This prevents thermal throttling and maintains hardware health, which are essential tradeoffs for a quiet, cool environment.
This setup keeps your rig cool and quiet without sacrificing performance. It’s a balance—too tight, and heat builds; too loose, and noise escapes.
Check out this guide for detailed ventilation and cooling tips.
Placement Hacks: Where to Put Acoustic Panels for Real Impact
Acoustic panels work best when placed at the right spots—mainly where sound bounces first. The mirror trick is a handy way to find those spots: have someone move a mirror along the wall while you sit in your listening position. Wherever you see the speaker’s reflection, that’s where to put a panel. Understanding why these points matter is crucial: first reflection points are where sound waves change direction after bouncing off surfaces, causing echoes and muddiness. Proper placement at these points prevents internal reflections from bouncing back into your microphone or speakers, leading to clearer recordings and more accurate monitoring.
In a small closet, focus on :
- First reflection points on side walls
- Ceiling above your head
- Behind your microphone or monitor
- Door gaps and edges
Placing panels here reduces echo, improves clarity, and makes your recordings sound more professional. The tradeoff is that covering too much can deaden the space, so aim for a balance—covering 20-40% of reflective surfaces often yields the best internal sound without overly dulling the room. For more detailed strategies, check this treatment guide.
Corners and Bass Traps: Do You Need Them in a Closet?
In tiny rooms, low-frequency buildup is common, especially in corners. Bass traps placed in the corners can tame that boominess, making your recordings clearer and more balanced. But in a closet, the space is so small that broad absorption and soft materials often matter more than focused traps. The tradeoff here is that bass traps are more effective in larger spaces, where they can absorb low-end energy before it accumulates, whereas in a tiny closet, over-absorption can make the space sound unnatural or overly dead. If your voice sounds muffled or you notice bassy echoes, add some bass traps or foam wedges in the corners. Just like in a tiny vocal booth, these treatments prevent low-end from bouncing around and muddying your sound. Properly implemented, corner treatments help control low-frequency issues, but in a small closet, focus on broad-spectrum absorption first, then add targeted bass trapping if needed. Research shows that in rooms under 100 square feet, properly treating corners can improve clarity by over 50%. For ideas, see this bass trapping.
Sealing Gaps: The Hidden Key to Soundproofing a Closet
Gaps around doors, vents, and electrical outlets are the biggest leaks for sound. Sealing these with weatherstripping, acoustic sealant, or draft stoppers is often the cheapest and easiest fix. It’s like putting a lid on a noisy pot. However, the tradeoff is that overly sealing a space can restrict airflow, leading to heat buildup—so finding the right balance is key. A well-sealed door can reduce sound escape by over 70%, but if you seal too tightly without proper ventilation, you risk overheating your equipment. Check for cracks, gaps, and leaks regularly, especially around the door frame, and consider using adjustable vents or active cooling solutions to balance soundproofing with airflow. For best results, combine sealing with internal treatment—like foam panels—and ventilation to keep things cool. This approach transforms a noisy closet into a quiet, controlled space while maintaining safe operating temperatures.
What to Use Instead of Panels: Blankets, Rugs, and DIY Tricks
If you’re short on budget or just starting out, heavy blankets, moving pads, and thick rugs can do a surprising amount of work. Hang blankets on walls, drape rugs over doors, and place soft furnishings where sound reflects most. This approach offers a tradeoff: while not as effective as dedicated acoustic panels, these DIY solutions are flexible and quick to implement. They absorb high frequencies and reduce early reflections, which are often the main contributors to echo and muddiness in small spaces. For example, a thick moving blanket taped to the wall can reduce reflections at the first point by 20-30%. Combining this with sealing gaps and strategic placement can significantly improve your sound environment without much investment. These low-cost treatments are especially valuable in tight spaces where installing panels is impractical or too costly. Check out affordable options here: Amazon.
How Much Treatment Is Enough? When to Stop and When to Keep Going
In small closets, over-treating can be counterproductive. Covering 20-40% of the reflective surfaces usually suffices for clear vocals and a decent mix. Excessive treatment can make the space sound dull, lifeless, or unnatural—reducing the room’s natural acoustics and affecting how you perceive sound. The key is understanding that more isn’t always better: targeted placement at reflection points, combined with sealing gaps, yields the best results without sacrificing the room’s liveliness. Use your ears as the final judge: if the sound sounds overly dead or muffled, you’ve gone too far. Conversely, if it still echoes or feels uncontrolled, add a few more panels or move blankets around. The tradeoff here involves balancing internal clarity with natural room acoustics—aim for a controlled, balanced sound that supports your recording and mixing needs without making the space sound artificially dead.
Frequently Asked Questions
Will acoustic panels make my closet soundproof?
No, acoustic panels mainly improve internal sound quality by reducing echo and reflections. They don’t block sound from escaping or entering. For soundproofing, sealing gaps and adding mass are necessary.Where should I put the first panel in a closet studio?
Place the first panel at the first reflection point—where sound from your microphone or speakers bounces first. Use the mirror trick: have someone move a mirror on the wall while you sit in your usual position to find these spots.Do I need bass traps in a small closet?
Yes, especially if you notice boomy lows or muffled vocals. Bass traps in corners help tame low-frequency buildup, making your recordings clearer and more balanced.How many panels do I need for vocals only?
Treating about 20-40% of the reflective surfaces, focusing on first reflection points and the ceiling, usually suffices. Over-treating can dull your sound, so start small and listen.Should panels go on the wall, ceiling, or door?
Prioritize the side walls at reflection points, then the ceiling above your head, and also seal gaps around the door. Each location targets specific acoustic issues in a small space.Conclusion
If you want quiet, professional-sounding recordings from a tiny closet, the secret is in smart placement and sealing—more than just slapping on foam. Moving the rig away, sealing gaps, and treating key reflection points make a world of difference. It’s a simple approach that turns chaos into clarity—quiet, cool, and ready for your best work.
Think of your closet as a tiny studio, not a box to be tamed but a space to be optimized. With a few tweaks, you’ll be surprised how much cleaner your sound can become—no fancy gear required.